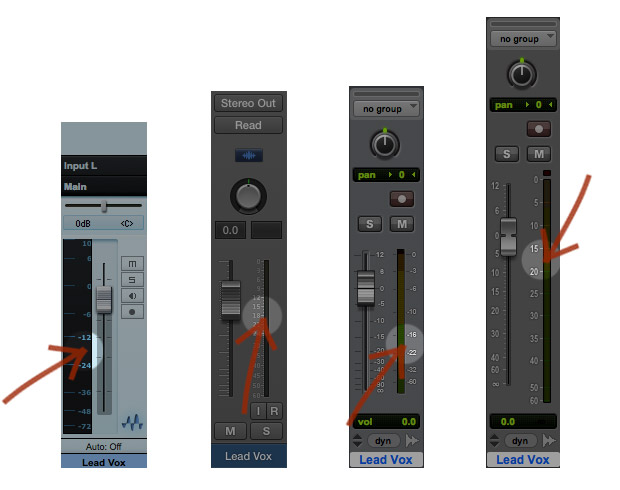
If you read the advices I’m sharing with my free eBook “The Recording Roadmap”, then you know you should set your recording levels by keeping them around -18dBFS on average, with peaks jumping a bit higher. That’s one of the most important steps to consider when setting everything up for recording! But…
The problem is that the meters we can find in our DAWs are all different and not always “well scaled”. While some meters will give you a good read, others will put that -18 all the way down on the scale, which may make you feel a bit weak…or “chicken”… And maybe you might feel the need to push the gain of the input signal harder, to compensate.
Same Thing Told In Different Ways
Don’t do it! That’s just the way your DAW was designed.
There are many different ways to represent stuff like levels in the digital domain, every DAW has its own style to show us things and every meter will tell us its own version, even given the same input signal.
To help you set the flag on this thing, here’s a quick comparison between the meters of 4 different popular DAWs. As you can see, they’re all measuring the “sweet spot” of -18dBFS at different heights.
Note: the guys at AVID actually “fixed” that not-so-well scaled meter in Pro Tools 10.
They changed the scales, giving us a more suitable meter with Pro Tools 11/12.
Like I said above, these are just the choices made by the manufacturer and should not influence you. Once you know where your software is measuring the “sweet spot”, just keep an eye on the -18dBFS tag and make sure your signal is averaging there when setting your levels. Done!
That -18 is very close to the value used back in the analog days (that 0VU on a VU meter). Don’t worry, you’re doing it right!
Remember: It’s Average Level (RMS) of -18dBFS
Just to avoid confusion: I said -18dBFS averaging. We’re not talking about peak levels here.
Your peak levels will be (and should be) higher than -18dBFS, and how much will depend on the source instrument. Your signal has to hover around -18dBFS, while sometimes being lower, sometimes higher than that.
Metering With Different Tools
If you want to stop thinking about scales and free up some brain space, maybe you can consider skipping the meters or your DAW and use something else to set and monitor your levels.
For instance, tools like the TT Dynamic Range Meter will be fine. This one is really well scaled and gives you plenty of informations about both average and peak levels.
You can even learn how to read a good old VU meter and use that if you will. To me it’s still the best way to check levels, actually; I can get a better and faster reading out of it… (And of course, you can use a plugin! You won’t need to buy a real one…).
Set one of these meters right on the input of your track, or load it on an aux channel and fed it with the signal you want to measure and you’re done.
These meters will show you the signal levels in a way you’ll probably like more, so you can record with the right levels I’m suggesting you, leave some headroom above and still feel like a “real man! The best of both worlds, isn’t it?
What about you? Did you ever felt somehow discouraged by the meters?
Leave a comment below and let me know!


![Printing Virtual Instruments To Track [Reader’s Question]](http://www.recording64.com/wp-content/uploads/2014/07/mini_grand-150x150.jpg)

![From Mixing To Mastering – How To [Reader’s Question]](http://www.recording64.com/wp-content/uploads/2014/10/mixing_desk500-150x150.jpg)
