Unless you are about to invite all of your audience inside your studio to listen to your music, then you’ll need your mix to sound good on the widest range of audio devices as possible, so that everyone can enjoy it, no matter the device they’ll use. Some time ago, I wrote about that super helpful reality check I can get from a boombox and today I want to share a similar hack you can do by using just an EQ.
With nothing more than your current setup and some very simple EQ curves, you can simulate the frequency response you are going to get on various different systems. This will let you hear your mix from a completely different perspective, giving you the chance to spot and fix some problems you wouldn’t have noticed otherwise!
Here are the 3 curves that help me the most:
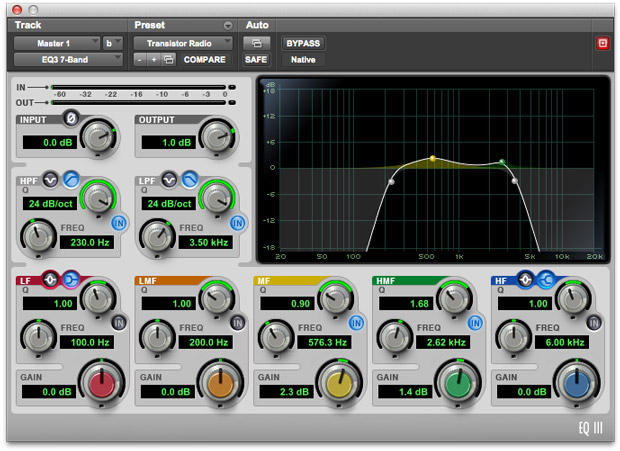
#1 – The Transistor Radio
Mimics: tiny radios, small TV speakers and cheaper car audio systems.
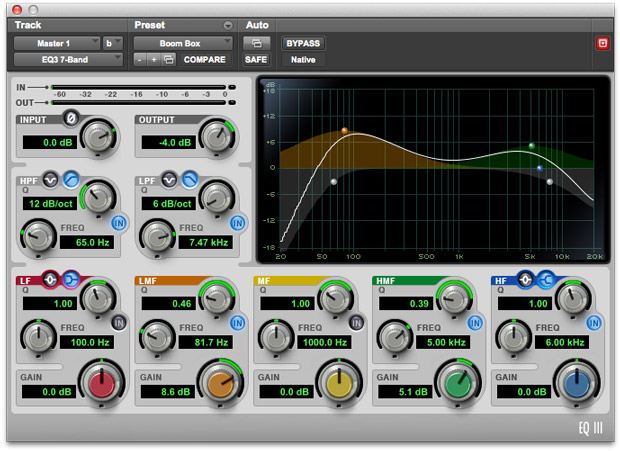
#2 – The Boom Box
Mimics: boomboxes, big stereos, bass-boosted devices, bigger car audio systems.
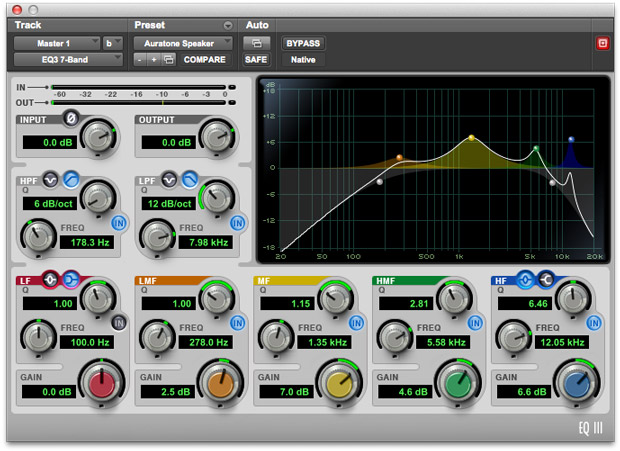
#3 – The Auratone Speakers
Mimics: a cheap and small pair of speakers often used to check mixes in studios around the world. You can use this preset to simulate small commercial speakers as well.
In Action!
Pick your favorite EQ and set it to the master bus, last in your effect chain. To make the job a bit easier, I suggest you to use a parametric EQ with many different bands and with a box that shows you the curves you’re drawing. Every popular DAW should come with one of these toys included. Note: Make use of a linear phase EQ if you get the choice.
Draw your curve to simulate the speaker you’re after and then engage/disengage the EQ while listening. Pay attention to the overall balance of the song and notice if something disappears or annoys you.
For instance, let’s say you’re testing your mix with the “Transistor Radio” preset…
With that curve, as you can see, all the low end is gone, and so is the high end. Your song is locked into that boxy midrange…
Is it still balanced? Can you still hear the upper frequencies of the bass line? Is the snare sticking out too much? Are the guitars sounding a bit too harsh? These are just some examples of the questions you should ask yourself while testing your song with this method. Every speaker will put your mix under a different light, and so will do every EQ curve. You’ll need to change your questions accordingly.
Aim At The Worst (Listening) Case
You’ll be scared when you’ll bypass the EQ. Everything will sound fuller, bigger and better… But remember: unfortunately, that’s not how the average people will enjoy your music. So make sure your mix is rocking even on the ugliest EQ curve (with some common sense, of course). It should sound balanced on every set of speakers (or a good approximation of that), and if you can get it work on all those 3 curves above, you’re in the right ballpark! Guaranteed.
This approach will save you some time as well, as you won’t have to print your track to file, go to your car or your living room to test it, get back, fix it, rinse and repeat… You should not skip a real alternative speakers test, but you can shorten the times (and the trips) a bit and make the big part of the work while sitting comfortably in your studio! mmm, but maybe your fitness won’t thank you too much for this, though…:( We can’t have it all, right?
Have Fun With Presets
A cool thing is that many stock EQ plugins that come with our DAWs are actually loaded with several presets that mimic different audio devices and listening environments, from telephones to clubs! You should find them inside some oddly-named presets folder (in my case it’s “Special Effects”). I actually found I’m using presets more and more as time goes by, tweaking them a bit to suit my needs. You can do the same.
Start with a preset or just copy the settings above, tweak them to your tastes, maybe to simulate your old computer’s speakers, a mobile phone or whatever, and get more from both your monitors and your plugins at no cost!
Today I want to leave you with a simple question: have you got some tricks you use to check your mixes before releasing them to the world? Share your favorite one below!




![Printing Virtual Instruments To Track [Reader’s Question]](http://www.recording64.com/wp-content/uploads/2014/07/mini_grand-150x150.jpg)
Great article on EQ curves for mixing reference; very useful, especially for those without multiple monitoring options, including those working on laptops/headphones.
Thanks! Glad you liked it!
Invaluable tips here. Thanks a bunch!!! This site is great!
Glad you’re liking the content 🙂 Thanks a lot for your comment and stay tuned, more stuff to come in 2016!
Hey. Great info. I have another free system I use. I put my track on my phone and go thru the different eq settings in the music player. This may be useful to get an idea of what your music will sound like with different eq curves and it’s free :D. Note all phones may not have this option but many do.
Hi! Great option. Just perhaps a bit time consuming as you have to print your mix, copy it over and do some back and forth, but definitely a very valid “real-world” test. Thanks for sharing!
thanks for the information
Hi! Best tips in years! I have Slate VSX, ozone mastering and too many plugins etc but nothing fixes the mid frequencies like this! Even had a paur of ns10’s but could’t understand how to use them.. This is the best, most obvious ”make sense” method in a long time! Got an idea that it would be nice to setup a last bus (think mixbus) with three eq plugins, each with one of the 3 settings so you can easily switch between the settings at ny time and also keep the master track less busy. I’ll try it asap! Thanx a alot onec again! Great article!!! All the best! Martin
Hi! Glad it helped you somehow!!! Thanks for your kind words 🙂